Vues
VueXR Rig
It is an asset store package that allows users to upload and edit Vues asset bundles and unity packages directly from unity 3D to VueXR platform. VueXR is a Xtended reality platform that showcases the uploaded content in AR, VR and MR.
To upload a vue on VueXR you have to create an asset bundle first.
For that, go to the asset store and download VueXR Rig asset.
Download and Import this asset to your project .
After importing VueXR rig file you will find
VueXR Rig menu option in the menu bar
You will find vue rig folder into the project window. There are 3 subfolders to the folder Editor, Resources, and Scenes. You don’t have to worry about all these folders except Scenes folder. Here in this folder, you will find a scene named VueXR Rig Scene. In the Hierarchy window, you can see an untitled scene which was loaded by default on unity startup.
We don't need this scene, we will be using VueXR Rig scene. Click on Rig scene to load it.
The VueXR Rig scene is loaded with some objects by default. The main camera, Floorplane Directional light, Eventsystem, and VuePlayer.
In VueXR Rig,
The
Observer resembles the viewer (user) in VueXR, its height is 1.4 meters which is an average human height. There is a camera located in the observer’s head, this camera allows the user to view the VueXR world with the perspective of a Human. Users have to use this observer as a reference to Position, Rotate and Scale the 3D objects while creating a Vue.
For Vues we don’t need a scene means no camera at all, but we will use this main camera and light for reference only. VueXR already has a main camera in the scene and this camera is controlled by the user to view the scene in every direction.
Floor Plane
The plane in VueXR rig is located at x-0, Y-0,Z-0. The plane represents ground in VueXR. We don’t need plane in our Vues as VueXR already has a plane which acts as a ground. This place also casts shadows of the objects.
Directional light
Directional light is like a sunlight in a scene in unity, for this scene we will only use it for reference purpose only. And we don’t have to worry about its position and rotation you can change it for your reference.
VueXR uses light estimation in Vues, this works by estimating the visible light around the user’s device and adjusting the scene light while playing a vue. VueXR also plays XR content on GPS location, this type of Vue is called a Vuespot. To make a users experience more realistic for a VueSpot, VueXR uses the device’s gps location to cast light and shadows that resemble the sunlight for a location of a VueSpot.
Event system – we don’t need to worry about it, it is a part of canvas UI
Vueplayer
Select it and go to the inspector window to explore its components. There is a script to spawn an object is attached to it.
These are all the objects that came along with the scene. You can create your object in this scene or you can simply drag and drop it from your other projects. Now create a prefab by dragging the object in your project window. Then drag the prefab you want to play in VueXR and drop it on Vue prefab to spawn, on the script component in the inspector window.
Before you hit the play button please check aspect ratio in the game window. Select it 1920 by 1080 aspect ratio, if it is not visible then click on add button then manually add values to it.
Now Play your Vue
You can view the scene from different angles simply by left click and drag the scene around in the game window
Scroll up and down to zoom in and out of the scene,
Pause the scene with this pause button.
Take a snapshot using this button, you can use this as the cover banner for your Vue
Click on this button to fly freely in 6 DOF using arrow keys, this allows you to test fly mode in your VR Vue
Use this seek bar to adjust your moving speed in the test mode, similar option is available to viewers in the webGl
Click on help button for help
Click on this button to close your Vue in unity’s play mode
Click on this button to reload your Vue in unity’s play mode
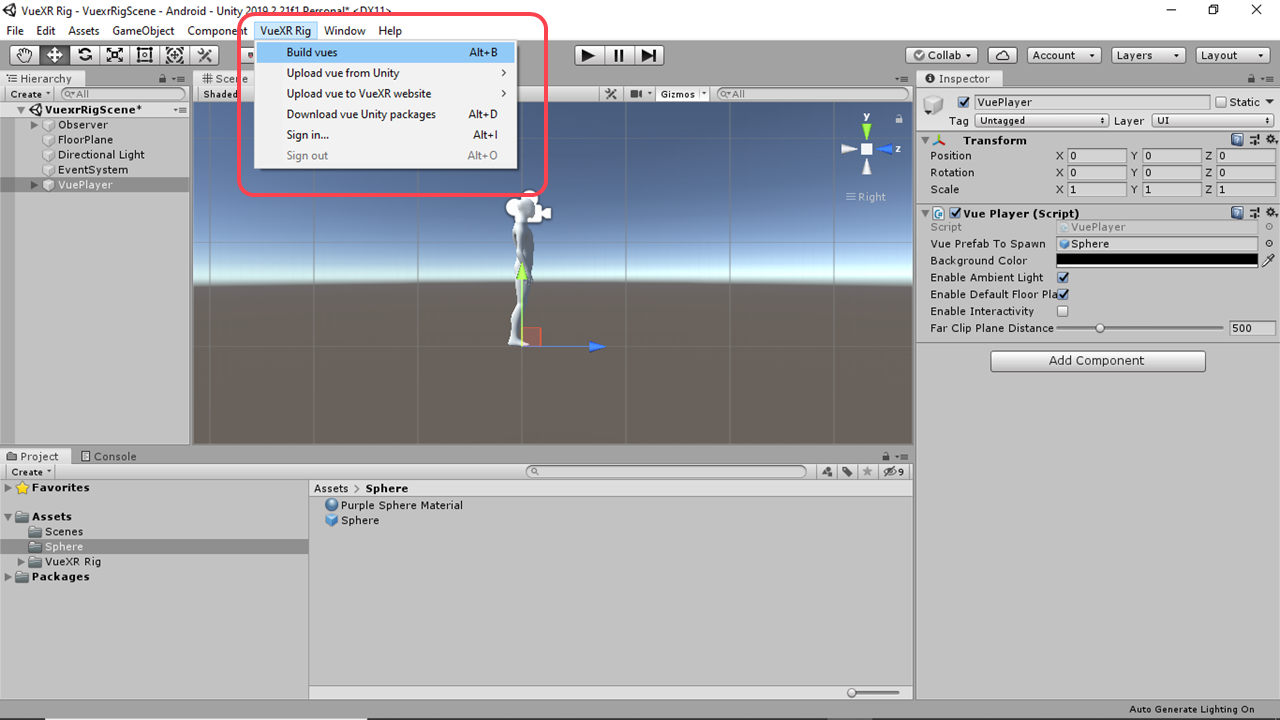
Once you are done with creating and testing of your object prefab, its time to build Vue. Go to Vues option in the menu bar.
VueXR Rig menu
The VueXR Rig menu in the menu bar has 6 menu items with submenu items,
- Build Vues
-
Upload Vue from unity
- Add new Vue
- Edit unlisted Vues
-
Upload Vue to VueXR website
- Add new Vue
- Edit unlisted Vues
- Download vue unity package
- Sign in
- Sign out
-
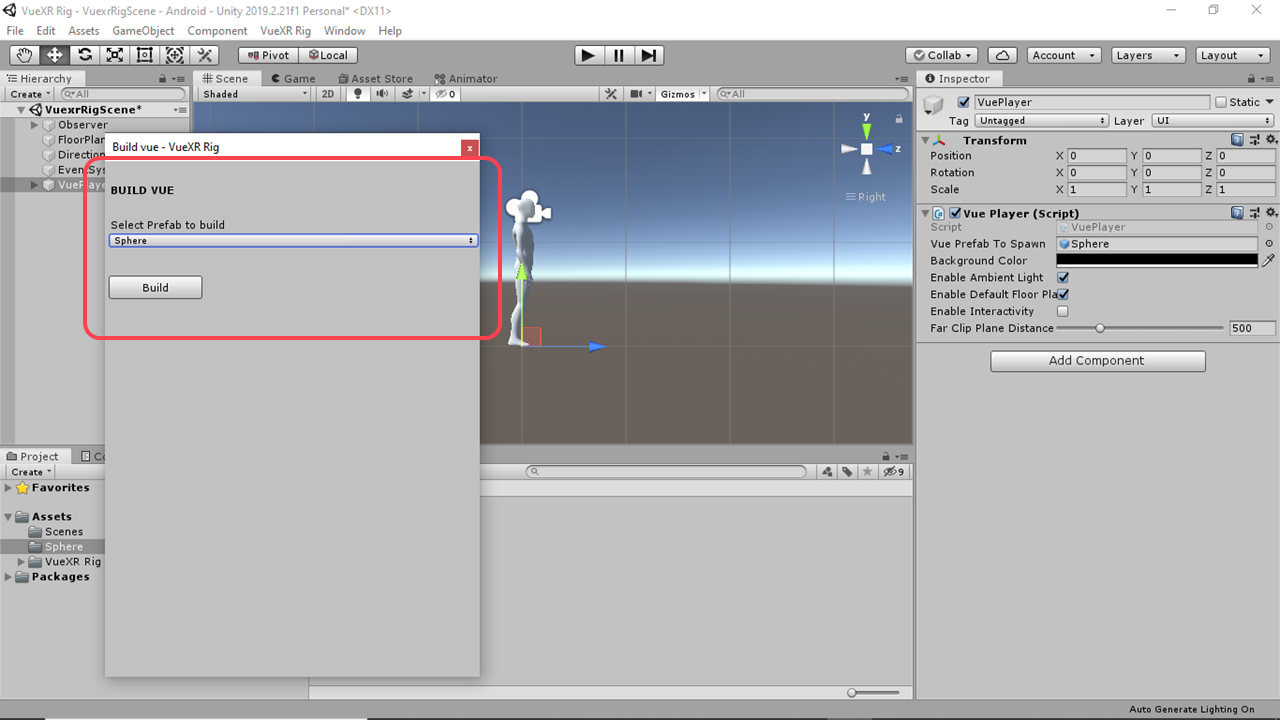
Build Vues
Select this option to build Vues. Once clicked, it will open build window, select the prefab you want to build and click on build button, it will automatically build Vue for all available platforms such as Android, IOS, and WebGL. It will also build unity package of your prefab.
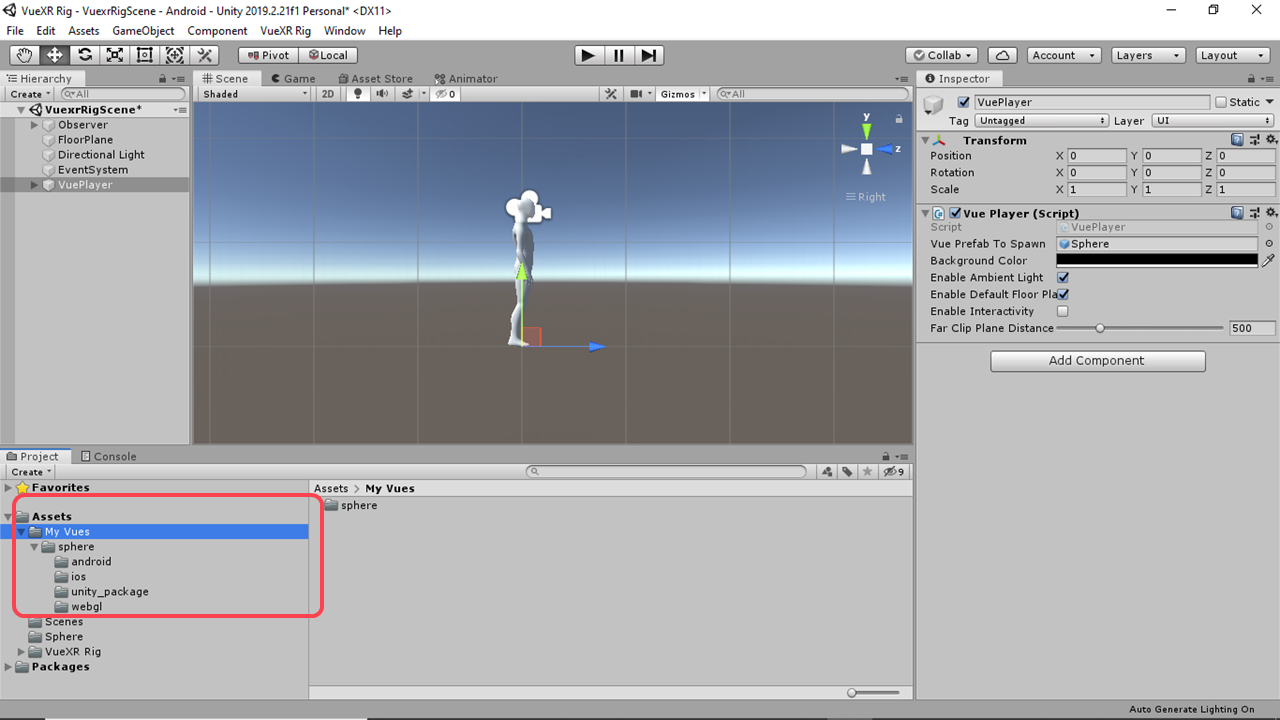
Once the build process is done You will find My Vues folder in project window into the assets. Now, your Vues are ready to be uploaded.
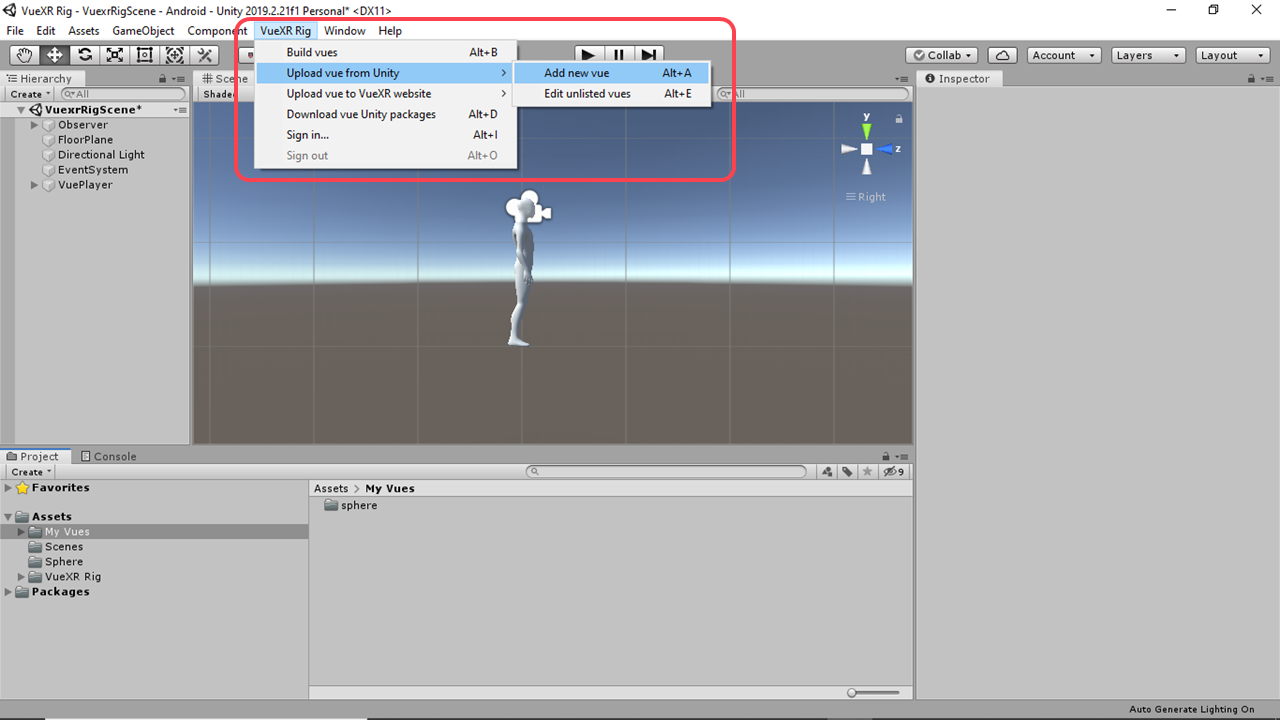
You can upload Vue directly from unity or you can upload it via the VueXR website.
-
Upload Vue from unity
-
Add new Vue
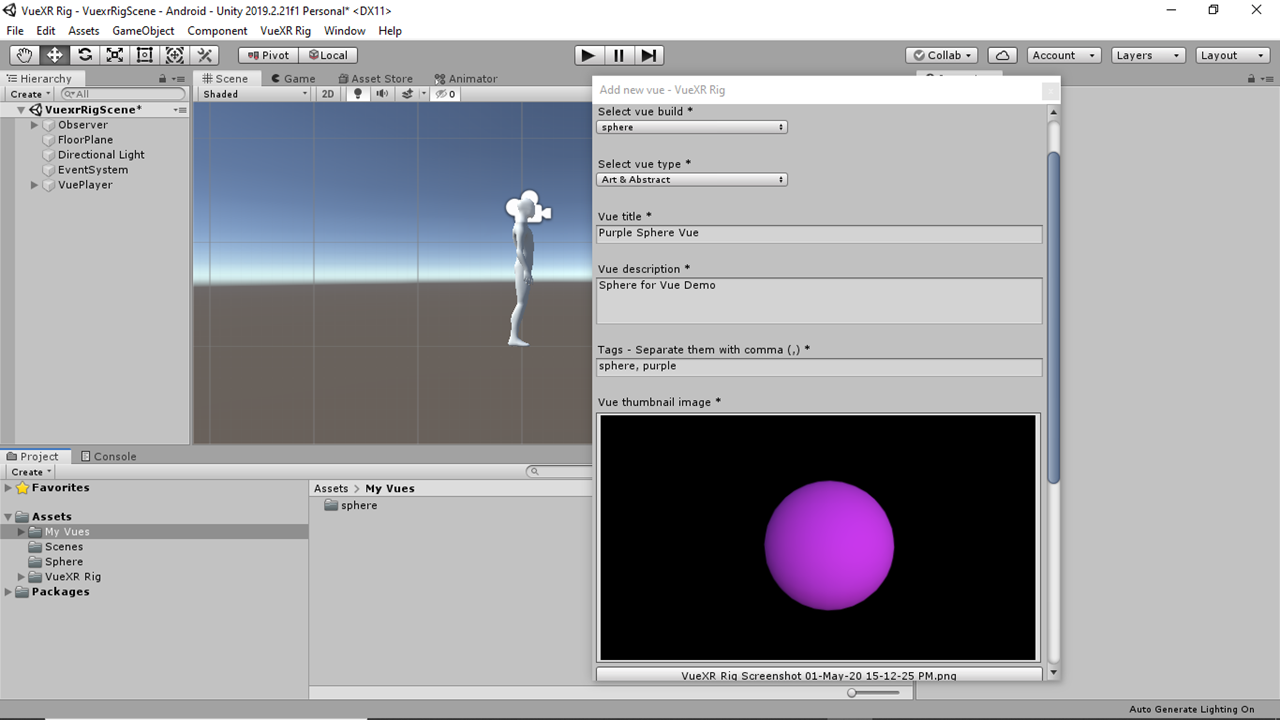
If you want to upload directly from unity click on upload vue from unity then click on add new vue. Give your credentials.
A form is displayed. Fill the form with details. Select Vue type, title, and description. For the banner image, click on choose image and select the screenshot you took while playing the vue, you have to upload an image with aspect ratio 16 cross 9 with a minimum resolution of 720 X 405. You can also change the background color and display mode here. Set ambient light on/off and turn on/off interactivity as required. Then simply click on upload. After uploading you will find pop up window by clicking view button you will be redirected to the VueXR website. Again, by giving your credentials you can check your Vue on the website.
-
Edit unlisted Vues
Now, what if you want to edit your vue. To edit your vue, first, unlist it using your mobile device. Editing and uploading again are quite easy here, You can edit vue directly from unity or you can edit it via the VueXR website.
First, let’s edit our vue directly from unity, after making the required changes, click on apply to update your prefab. Then go to vue and click on build vue. After completion of the build process, one popup window will be displayed do not select upload. Select Cancel
Then go to upload vue from unity then click on edit unlisted vues.
Login with your credentials. It will show you all unlisted vues. Select the vue you want to edit.
If you want to edit anything in form edit it and save it.
Then click on go ahead in the popup window. Click on view button, it will redirect you to vue website. Here, you can check your edited vue.
-
Upload Vue to VueXR website
-
Add new Vue
To upload directly to the VueXR website. Click on upload vue to the VueXR website then click on add new vue. This will redirect you to the VueXR website.
Now, give your credentials and log in. Here, give Vue title and description. Then select your category according to your Vue. Select your Vue banner image and upload it. Now for android Vue file go to unity screen then open My Vues folder, here you will find one folder with your given name. Open the android folder by right-clicking, then select show in explorer here, click on the android folder there are two files. One is unity 3d file and another one is metafile. Select unity 3d file. Do the same for other three asset bundle and the unity package. Now select the display mode. And you can select any background color for webgl view of your Vue. Last option is for the location where you want to show your Vue. Anywhere or at specific GPS location.
For anywhere just select this button and for Vuespot give the city name where you want to show this Vue and then select radius which is the visibility range of Vue, then click the button of rules of engagement. And then click on save button.
You can upload your vue by these two methods. The first method of uploading directly from unity is quite short as compared to the second one. However, the choice is yours.
-
Edit unlisted Vues
To edit our Vue from the VueXR website, Make your required changes and go to VueXR Rig and click on build Vue. After completion of the build process, one pop-up window will be displayed do not select upload. Please select cancel
Now go to upload Vue to the VueXR website then click on edit unlisted Vues. This will redirect you to the VueXR website. Now, give your credentials and log in. Edit, title, description, category and banner image if required.
Now update the Vue files for all available platforms. Now for android Vue file go to unity screen then open My Vue folder there you will find one folder with your given name. Open the android folder by right-clicking, then select show in explorer here, click on the android folder, there are two files. One is unity 3d file and another one is metafile. Select unity 3d file. Do the same for other three Vue files and unity package. Edit the display mode, background color and anywhere or Vuespot option if required. And then click on save button.
-
Download Vue unity package
And the last option is for downloading your uploaded Vue unity export package from www.VueXR.com you can use this option if you don’t have your Vue project with you and you want to edit it.
To test and Publish Vue
Once you are done uploading the Vue to the website go to VueXR app on your mobile device sign in with the same ID (used to upload Vues) and follow this steps to test and publish it:
- Click on the VueXR icon in the right bottom corner of the screen
- Click on Vues icon
- Click on uploaded Vues icon
- Click on the card of vue uploaded by you which is unlisted at this moment
- Click on view
The Vue is downloaded and played, once you are happy with it, click on publish and it becomes available for the whole world to experience.